Logback Demo
Welcome to the logback demo! This document will take you through a tour of some of logback's major features.
Installation
First, please download the logback demo. You will need to install a git client and issue the following command on a console:
git clone git://github.com/qos-ch/logback-demo.git logback-demo
This will retrieve a copy of the logback demonstration web-application to a directory called logback-demo. The logback demo can be packaged as a war file and deployed to an application server. We strongly recommend the use of Maven to accomplish this task, since it takes a single command in order to compile, package and run this demo.
Using Maven, let's package the files and run the demo for the first time. From the logback-demo directory, issue the following command:
mvn package jetty:run
Then, visit http://localhost:8080/ to view the main page of the logback demo.
Logback-classic
By default (or as packaged), logback-demo configures
logback-classic with two appenders: a ConsoleAppender
and a RollingFileAppender. The
RollingFileAppender sends logging events to a file
called logFile.log and will roll over the active file
every minute. The old file will be renamed and compressed to a
zip file. The ConsoleAppender will output
the logging requests to the console, and shorten the logger names
to gain space on the console window, without loss of
legibility. For example,
ch.qos.logback.demo.prime.NumberCruncherImpl will be
abbreviated as c.q.l.d.prime.NumberCruncherImpl.
We highly encourage you to study the logback.xml configuration file located under the src/main/resources/ folder. You might want to keep this file open in an editor window, since we will modify its contents throughout the demo.
Let us now visit the ViewStatii page, via the navigation
menu on the left-hand side of your browser's window. This page
contains the content of the Status objects that were
created up until now. Status objects are a part of
logback's internal reporting framework. They allow you to see what
is going on inside logback, and check that a configuration file has
been parsed correctly, or that rollovers occur as expected.
You should be seeing log messages printed on the console and the contents of "logFile.log" file rolled over every minute.
If you visit the View logs page (by clicking on the link located in the menu on the left), you should see it has no content. Let us change that by uncommenting two parts in the config file.
Remove the comments around
<!-- Basic Cyclic buffer
<appender name="CYCLIC" class="ch.qos.logback.core.read.CyclicBufferAppender">
  <MaxSize>512</MaxSize>
</appender>
-->
and around
<!-- Part I: Basic Cyclic buffer <appender-ref ref="CYCLIC" /> -->
The <appender-ref> element found at the
end of the configuration file links an appender to a given logger,
in this particular case the root logger.
A CyclicBuffer keeps track of the incoming logging event
stream in a circular
buffer for later display. After having removed the comments
around the two element/s shown above, reload the logback-demo
web-application by exiting the previous "mvn" command with
CTRL-C and issuing it again:
mvn package jetty:run
This time the View logs page should have contents.
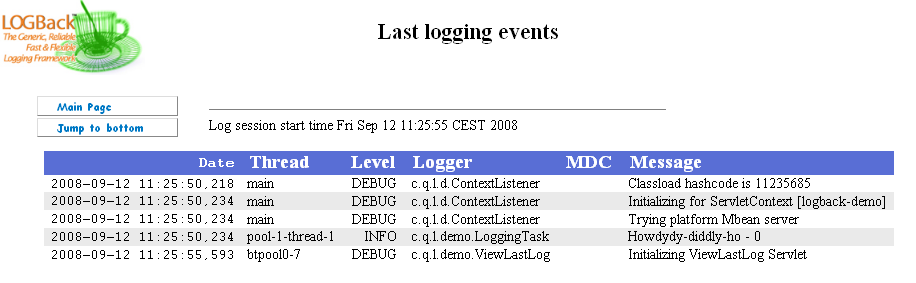
By virtue of CyclicBufferAppender, this page can
fetch the last events and present them through a servlet. We see
that every ten seconds a line is added to the logs. The formatting
of this page is made with a HTMLLayout. This component
creates a table containing logging events, based on a pattern that
describes the information you wish to see in the table.
Having the logs cluttered with repetitive Howdydy-diddly-ho messages is wasteful. We can get rid of them with an appropriate filter. Uncomment the block entitled Cyclic buffer with Evaluator. You should then comment the block entitled "Basic Cyclic buffer" that we uncommented earlier.
Let's take a look at the filter we've just added:
<filter class="ch.qos.logback.core.filter.EvaluatorFilter">
<evaluator name="loggingTaskEval">
<expression>
logger.getName().contains("LoggingTask") &&
message.contains("Howdydy-diddly-ho") &&
(timeStamp - event.getStartTime()) >= 20000
</expression>
</evaluator>
<OnMatch>DENY</OnMatch>
</filter>The <expression> element uses the familiar
Java language syntax. It checks that the name of the logger contains
the String LoggingTask, but also that its message contains
the string Howdydy-diddly-ho. Moreover, in order to be
sure that the Howdydy-diddly-ho task actually works, we add
a last condition which checks that at least 20 seconds have
elapsed after application launch. The variable references in the
expression, namely (logger, message and
event) are implicitly made available by logback. The
<OnMatch> element lets the user specify the filter's
behaviour once the expression matched (evaluated to true).
After a restart, the View logs page will shows the Howdydy-diddly-ho logs, but only for the first 20 seconds. If you wish to see new logging events to be shown on the "View logs" page, then visit the "Prime number" page.
Turbo Filters
Logback supports a special category of filters called
TurboFilters. TurboFilter objects are ultra-fast,
context-wide filters. They can be very useful by setting
context-wide (i.e. global) conditions for enabling or disabling
logging events.
Remove the comments around the block entitled "TurboFilter: MDC value".
<turboFilter class="ch.qos.logback.classic.turbo.MDCFilter">
  <MDCKey>username</MDCKey>
  <Value>sebastien</Value>
  <OnMatch>ACCEPT</OnMatch>
</turboFilter>
This <turboFilter> element adds a
TurboFilter to the logging context which will enable
events if the MDC contains a key named "username" set to the value
"sebastien". The logback-demo application contains a servlet
filter which will set the MDC key "username" with the name of
the currently logged-in user.
For the purpose of this demo, let us disable all logging by
setting the root logger's level to OFF.
<root>
  <level value="OFF"/>
  ...
</root>
Now restart the server as before.
Once on the main demo webpage again, perform a number of actions (e.g. calculate a few prime numbers) and visit the View logs page. The table should be empty.
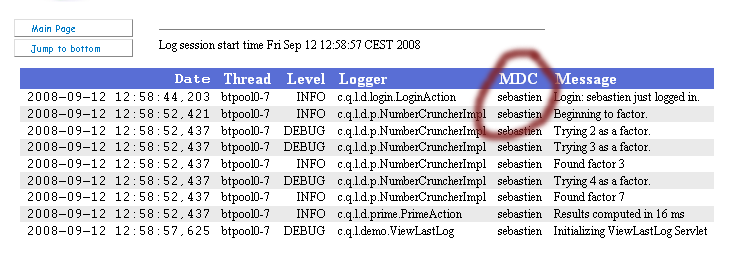
Now login to the logback-demo web-application with the username sebastien and perform a few prime computations. The View logs page should show the logging events that were generated. Moreover, each logging event will have an MDC field associated with the name of the logged-in user, in this case, sebastien. Please log off before continuing the demo, using the logout button on the left.
Parameterized logging
Parameterized logging is not a logback feature per se. It is part of SLF4J. Usually, a logging request is issued as follows:
logger.debug("Hello, my name is" + username + ", I am " + age + " years old.");In the above call, the cost of constructing the message of type String is borne even if the log request is disabled.
SLF4J offers the following alternative:
logger.debug("Hello, my name is {}, I am {} years old", username, age);In this alternative, the final log message will be formatted only if the log statement is enabled.
At present, let us see what kind of gain we can expect from this alternative approach. First, go to the Prime number page and compute factors for integers of your choice. Check the time it takes to compute the results. To see a clearer difference between the two formatting methods, you might want to try the two big integers that are listed below the prime number textbox. Jot down the time it takes to compute the result.
Now let us edit the NumberCruncherImpl class in
order to use parameterized logging. You will find this class in the
src/main/java/ch/qos/logback/demo/prime/ directory. Comment
line 54 (doing unconditional message concatenation) and uncomment
line 55 (parameterized logging). Restart the server with mvn
package jetty:run and re-run the factorization you tried
beforehand.
The time required to complete the computation should be much lower this time. Remember that we have turned off all logging in the previous step of this demo. In the initial version, we were constructing the message ("Trying "+i+" as a factor.") each time a factor was tested. With the parameterized logging, the construction of the message was postponed and, since logging was turned off, never done. Thus, parameterized logging can significantly reduce the cost of disabled log statements.
Markers
You can color log statements with markers. Markers are
part of the SLF4J API. If you look at the LoggingTask class (part of
logback-demo) which includes the Howdydy-diddly-ho log
statement, you should see that it is bound to a marker named
HOWDY marker. If you wish to drop log statements
bearing the HOWDY marker, you can use this
TurboFilter to do so:
<turboFilter class="ch.qos.logback.classic.turbo.MarkerFilter">
    <Name>HOWDY_FILTER</Name>
    <Marker>HOWDY</Marker>
    <OnMatch>DENY</OnMatch>
</turboFilter>
After you have set the root logger's level back to DEBUG and uncommented the MarkerFilter block in logback.xml, restart the server.
The logs bearing the Howdydy-diddly-ho message should no longer appear as they are associated with a HOWDY marker. You can check that by visiting the View Logs page.
Logback Access
Access logging is another important feature offered by logback. By default, the logback-demo web-application is configured so that each time you access it, an access log is printed on the console. The details of access logs are configured by the logback-access.xml file located under the src/etc/ directory.
Here is a rather minimal configuration for logback-access:
<configuration>

  <appender name="STDOUT"
    class="ch.qos.logback.core.ConsoleAppender">
    <layout class="ch.qos.logback.access.PatternLayout">
      <Pattern>%h %l %u %t \"%r\" %s %b</Pattern>
    </layout>
  </appender>

  <appender-ref ref="STDOUT" />

</configuration>
Note that logback-classic and logback-access are configured via different files: logback.xml and logback-access.xml respectively. If you wanted to turn off logging for logback-classic by setting the level of the root logger to OFF, logback-access would be unaffected by this change.
To see the logs produced by logback-access, just visit a few
pages and look at your console. The information contained in each
line has been specified in the configuration file. The
ConsoleAppender named STDOUT contains a
PatternLayout component. This layout component is
used in logback-classic to display either the message, logger name
or level of the request, but in logback-access it is used to display the
request method, requested page, status code and many other fields.
Here is a sample output for this appender.
127.0.0.1 - - 22/Jan/2007:14:35:40 +0100 GET /logback-demo/ViewStatii.do HTTP/1.1 200 3660
127.0.0.1 - - 22/Jan/2007:14:35:41 +0100 GET /logback-demo/index.jsp HTTP/1.1 200 2389
127.0.0.1 - - 22/Jan/2007:14:35:42 +0100 GET /logback-demo/lastLog/ HTTP/1.1 200 948
127.0.0.1 - - 22/Jan/2007:14:35:42 +0100 GET /logback-demo/index.jsp HTTP/1.1 200 2389
127.0.0.1 - - 22/Jan/2007:14:35:43 +0100 GET /logback-demo/prime.jsp HTTP/1.1 200 1296
127.0.0.1 - - 22/Jan/2007:14:35:44 +0100 GET /logback-demo/index.jsp HTTP/1.1 200 2389
127.0.0.1 - - 22/Jan/2007:14:35:45 +0100 GET /logback-demo/lottery.jsp HTTP/1.1 200 1209
127.0.0.1 - - 22/Jan/2007:14:35:46 +0100 GET /logback-demo/index.jsp HTTP/1.1 200 2389
127.0.0.1 - - 22/Jan/2007:14:35:48 +0100 GET /logback-demo/reload.jsp HTTP/1.1 200 1335
127.0.0.1 - - 22/Jan/2007:14:35:49 +0100 GET /logback-demo/index.jsp HTTP/1.1 200 2389
127.0.0.1 - - 22/Jan/2007:14:35:54 +0100 GET /logback-demo/login.jsp HTTP/1.1 200 1214
127.0.0.1 - - 22/Jan/2007:14:35:55 +0100 GET /logback-demo/Logout.do HTTP/1.1 200 1000
Filtering
In this next part, we are going to add some information to the
console. Let us imagine that we want to log the numbers that are
tried on the Lottery page. We will need a second
ConsoleAppender that will only print a given information
(e.g. the guessed number, along with some hints about the player). The
appender will also have to print that information only when a certain
page is accessed.
The necessary configuration lines are listed below.
<appender name="STDOUT_LOTTERY"
  class="ch.qos.logback.core.ConsoleAppender">
  <filter class="ch.qos.logback.core.filter.EvaluatorFilter">
    <evaluator name="lotto_eval">
      <Expression>
        url.matches(event.getRequestURL().toString())
      </Expression>
      <matcher name="url">
        <regex>Lottery.do</regex>
        <caseSensitive>false</caseSensitive>
      </matcher>
    </evaluator>
    <OnMatch>ACCEPT</OnMatch>
    <OnMismatch>DENY</OnMismatch>
  </filter>
  <layout class="ch.qos.logback.access.PatternLayout">
    <Pattern>
      LOTTERY: %A [%r] Guess=%reqParameter{guessed_number}
    </Pattern>
  </layout>
 </appender>
This appender will use a PatternLayout to format its
output. The %reqParameter conversion word is used to
extract the guessed number from the request, and print it.
It also uses an EvaluatorFilter that will prevent
the appender to display anything when the access' request url does
not match the given expression. You can see that it is easy to
specify a RegExp, name it and use it in the expression that will be
evaluated. In that case, we only entered the name of the
lottery.do action.
Let us uncomment the two elements with the Lottery to Console comments and restart the server. Now, try to play the lottery. You will see more lines in the Console that you've seen until now. At every try, logback will produce a log as shown below:
LOTTERY: 192.168.1.6 [POST /logback-demo/Lottery.do HTTP/1.1] Guess=321
Sending emails
Logback-access provides several components that are usually used
by the classic module. For example, a SMTPAppender can
be used to send an email when a specific event occurs. Here, we will
contact the lottery administrator each time a winner is detected. To
achieve this, we will add a SMTPAppender to the
existing configuration. Please uncomment the part of
logback-access.xml named Lottery to Email. Do not
forget to uncomment the appender-ref element at the end of
the configuration file that references the SMTP appender.
In the appender element, notice the use of a
URLEvaluator. This evaluator allows us to specify
one or more URLs that are to be watched. When one of them is
accessed, an email is sent.
A reload of the configuration has to be done before we can test this new component. Once done, try to play the lottery with the number 99. You should see a "congratulation" message but, most importantly, the specified recipients should have a new mail in their mailbox. The content of the email is a nicely formatted HTML table with information about the accesses that occurred before the triggering event.